Showing posts with label Paper Crafts. Show all posts

Saturday, February 5, 2011

Paper Craft: Baby Shower GIft Idea {Envelope Baby Memory Books}

Welcome to the final day of Baby Shower week ... I will be sad to see Baby Shower come to a close I have had fun sharing ideas that are all related to the same theme.
To conclude Baby Shower Week I have a paper craft project {Envelope Baby Memory Books} I made a couple years ago when I had several friends and family members having babies around the same time. This project can be made on a tight budget and is easy to reproduce over and over again. You can even change the theme of the craft to fit almost any occasion.
 ...
 Sorry folks no tutorial for this project just plenty of pictures.
...
These {Envelope Baby Memory Books} were really fun to make and are the perfect way for New Mothers to document the early milestones i n Babies life.
There is a page for documenting bringing Baby Home.
Record Babies stats on this cute page.
The two Mommies I made these books for had at least one child already so I made a page where they could document the first moment the new BIG siblings meet Baby.
And finally a couple blank lined pages for recording Baby milestones Mommy and Daddy don't want to forget.
...
Each one of these cute pages fit neatly into a standard sized letter evnelop that have been glued together accordian style and all wrapped up with a neat little bow.

Thursday, February 3, 2011

Tutorial: How to make Cupcake Toppers

Remember the Diaper Cake I showed you how to make here? To compliment the Diaper Cake I decided to use cupcakes as the dessert for my friend’s Baby Shower. I didn’t see the point of having two cakes and cupcakes still provided a nice sweet treat. Plus, I could save myself some time by using store bought cupcakes. The perfect solution when you are short on time and energy … like me 6 months pregnant and working full time!

To make these adorable Baby Shower Cupcake Toppers you just need a few supplies, most of which can be found in your own home!
...
Supplies:
Free Clip Art to match the Baby Shower theme (printed at home)
Colored Cardstock
Large Circle Punch
Toothpicks
Glue Stick
Glue Dots
Small Scissors
Store Bought Cupcakes
... 
Putting it all together:

To finish off the back of your cupcake topper press a blank cardstock circle to the back of your decorated cardstock circle. This will fully cover the glue dot and create a nice finished look (sorry I forgot to take a picture of this step).
...
And last but not least ... on the day of the Baby Shower stick one cupcake topper into the top of each of the 24 mini cupcakes and enjoy your super cute cupcake toppers.

Monday, January 31, 2011

Stay Tuned for Baby Shower Week

This posts kicks of a series of posts for what I’m calling Baby Shower Week! Recently I was able to co-throw a Baby Shower for a good friend of mine who is expecting her first baby in March. So to help welcome this little boy into the world I volunteered to make some decorative elements for the Baby Shower that would both cute and functional! I wanted to create decorative elements that were both cute and functional because I am all about Crafting on a budget. So during Baby Shower Week I'm excited to share my tutorials for Cupcake Toppers and Diaper Cake on a budget. Also this week I will feature a quick, inexpensive (to make), easy and cute Baby Shower gift that you can make with supplies you already have at home!
...
Preview of what's to come:

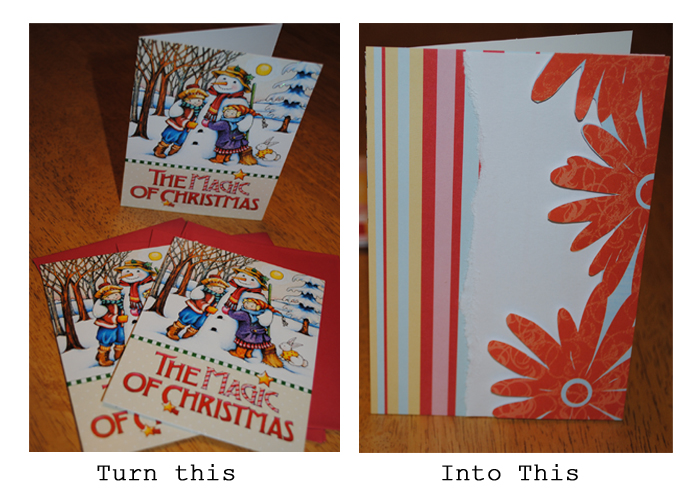
Repurposing: Unused Out of Season Store Bought Greeting Cards


Today I did a fun little project where I repurposed unused out of season greeting cards into more useful greeting cards. This is a simple project that anyone can recreate out of supplies that you already have at home making it the perfect crafting on a budget project!

I had some unused Christmas cards laying around the house and thought to myself it is such a shame that I will probably loose these before I get the chance to use them next year what a waste. Then I got thought, maybe I didn’t have to wait until next December to use these store bought cards I can repurpose them with some scrap scrapbooking supplies I have sitting in my craft bins. I had been intending to make a couple Valentine’s Day cards to mail to out of state friends, and this seemed like the perfect opportunity to stretch my creativity and re-use Christmas cards by transforming them to Valentine’s Day cards. 
...
Supplies:
Unused out of season store bought greeting cards
Paper trimmer
Small scissors
Adhesive
Scrap pieces of scrapbooking paper 
 ...
Putting it all together:
  1. Decide on a theme for your card … I wanted to make a couple Valentine’s Day Cards and a few cards that could be used for any occasion.
  2. Using your paper trimmer trim down your scrap pieces of scrapbook paper that is going to be your background for your new card
  3. Adhere your background paper to the front of the out of season store bought greeting card
  4. Use your paper trimmer and small scissors to cut out the rest of the pieces for your new card design from your scrap pieces of scrapbooking paper
  5. Adhere the rest of  your card design pieces to the background paper you’ve already attached to the store bough out of season greeting card … to add some dimension I also used mini pop dots to adhere some of my accent pieces
  6. The final step is to trim a plain white or colored piece of scrap scrapbook paper with your paper trimmer to cover the back of the card to create a more finished look and attach with adhesive.

Tuesday, January 25, 2011

Today's the day!

Today is the day I start a blog in an attempt to chronicle my attempts at domesticity! Cooking, sewing, paper crafts! Here I intend to share all my triumphs and yes even my failures as I’m sure there will be many. My hope is that you will enjoy creating along with me piece by piece as I work my way through my favorite domestic arts!

…

So here we go! Are you tired of trying to figure out which pictures of you have room for in your two page scrapbooking layouts? It seems there is a constant debate with two page layout … even with my 12x12 pages … of which pictures to leave out and which should be included. So one day I decided to do something about it. I set out to design a 2 page 12x12 layout that would feature 12 pictures!

…


…

Supplies used:
12 4x6 prints of the special event
3 sheets of 12x12 coordinating patterned scrapbook paper
2 sheets of 12x12 cardstock in coordination colors
Colored letter stickers
Mini alphabet stamp set
Ink pad in desired colors
Paper trimmer
Journaling pen
1 decorative paperclip

...

I wanted to create a page that would feature the special moments of welcoming a new member to the family. I wanted to highlight the first time aunts, uncles, grandparents, cousins, and siblings met the new baby. To do this I decided to create a photo collage page that would feature these special first meetings. Using my one of my mini alphabet stamp sets I stamped the name of the person meeting the new baby right on the picture. Because I was working with a two page layout I decided to have the picture of the Big Brother meeting Little Brother carry over onto the second page to bring continuity to the layout. Then I kept the second page simple featuring a couple additional photos of those in attendance at this joyous occasion and a bold title block.

...